Sticker-Making Tips in Procreate (Even If You’re New to This Whole Art Thing)

Sticker-making tips in Procreate are the perfect way to sneak in a little creativity even if your schedule looks like a tornado hit a to-do list.
Whether you’ve just downloaded the app or you’re still figuring out what a “layer” even is, this guide will help you go from “I kinda wanna try making stickers” to “Wait… did I just make that?!”
You don’t need to be a tech pro, an art expert, or someone who thrives on color-coded routines.
You just need a few beginner-friendly tools, some sticker-making basics, and a little space to play around.
Summary
If you’ve ever opened Procreate on your iPad and wondered how to actually make cute stickers (without spiraling into confusion and half‑finished drafts), this post has your back. You don’t need the best gear and expert-level skills— just a few beginner‑friendly tools, some essential Procreate features, and a simple workflow that feels fun instead of overwhelming. From choosing the right canvas setup to sketching, inking, coloring, exporting, and printing, you’ll walk through all the key steps to design stickers that look great and are ready to print — whether it’s for your own use, gifts, or a shop. Let’s turn your ideas into stickers you’re proud of, one fun step at a time.
And hey, if you learn better by watching, I’ve got tutorials on YouTube that walk you through everything step by step.
Ready to turn your ideas into stickers you’ll actually want to use (and show off)? Let’s do it.

Table of Contents
Make Your First Sticker in Procreate
Grab your starter file, the brushes, tips, and step-by-step cheatsheets you need to design your first cute sticker today.
Let’s Talk Tools: What You Actually Need to Start Sticker-Making in Procreate
Okay, so you’re ready to make some stickers in Procreate but now you're staring at your iPad like, “Do I need a $1,000 setup or nah?”
Short answer: nah.
You don’t need to buy the fanciest tools on the market or become a tech guru overnight. But having a few essentials on hand? Yes, necessary.
Here’s the real talk on what you actually need (and what’s just nice to have).
iPad, Apple Pencil & The Stuff No One Talks About
Not all iPads are created equal, and trust me you will notice if yours starts lagging halfway through outlining a rainbow frog on a scooter. (Yes, that’s a thing. And yes, you should draw it.)
Here’s what to look for:
- An iPad that works with Apple Pencil – Doesn’t have to be the newest model, but it should be compatible and have decent storage (those files pile up fast).
- If you don't have the cash for more storage space then you would need to be able to transfer files to your computer, an external harddrive, the cloud, or google drive.
I have an ipad Air 4th generation and it works just fine. I'm starting to run low on storage space though so I'll be hitting up my external harddrive to off load some of my work.
- Apple Pencil (Gen 1 or 2) This is a must. Pressure sensitivity = clean lines, juicy control, and fewer rage-quits. Version 2 is particularly awesome because it attaches magnetically to the iPad for charging and has a sleeker feel.
I have Gen 2 and I love it, I've never tried Gen 1 but I 100% recommend Gen 2. Unfortunately it doesn't come with the ipad so it'll run you a bit over $100.00
Since writing this article, I have had to upgrade I'm now rocking this combo iPad, Apple Pencil, Paperlike screen cover, case
*Don't feel like you need something this powerful to get started my old model worked great for a couple of years.
- Replacement Nibs Eventually, you will need to replace the nibs on your pencil. Some say the ones from Apple last longer. I have used both Apple and off-brand and the jury is still out for me.
- Pencil grip (total lifesaver) Not required, but highly recommended if your hand cramps or you find yourself accidentally toggling between tools every 7 seconds.
Yes, I know you can probably change that in settings. No, I have not done it. Also buy extra if you get the grips, I lose mine about 15 times a day.
- Paperlike screen protector (optional, but buy it) – Gives your screen that “drawing on real paper” feel, which is chef’s kiss if you're used to traditional sketching. You need this, whitout it your screen feels super slippery almost like your trying to draw on glass (haha, see what I did there?).
- Procreate, the software. You will need to buy a one time purchase of Procreate in the Apple Store and download it to your ipad. It's pretty reasonable priced, when I bought it, the price was $10.00

Understanding Procreate: The Sticker-Making Features You’ll Actually Use
Alright, let’s talk Procreate, aka that app you downloaded, opened once, and immediately closed because“WHAT ARE ALL THESE BUTTONS.”
Same, girl. Same.
But here’s the good news: You don’t need to learn every single feature to start making cute stickers.
You just need a few of the good ones, the MVPs that make sticker-making feel way less intimidating and way more “hey, I made this!”
Here’s what you’ll actually use on the regular:
Brushes: AKA Your Digital Art Tools
Brushes are how you draw, paint, and outline basically your creative BFFs in Procreate.
- The app comes with a TON of built-in brushes (you can ignore most of them at first seriously).
- For stickers, you’ll mostly use a pencil-y one to sketch (try the 6B!) and a smooth pen for inking (Monoline is a fave).
- Later on, you can totally explore fun textured brushes, but for now: simple = stress-free.
- Want to branch out? There are free and paid brush sets online that feel like “ooh girl, I didn’t know I needed this” once you try them.
Make Your First Sticker in Procreate
Grab your starter file, the brushes, tips, and step-by-step cheatsheets you need to design your first cute sticker today.
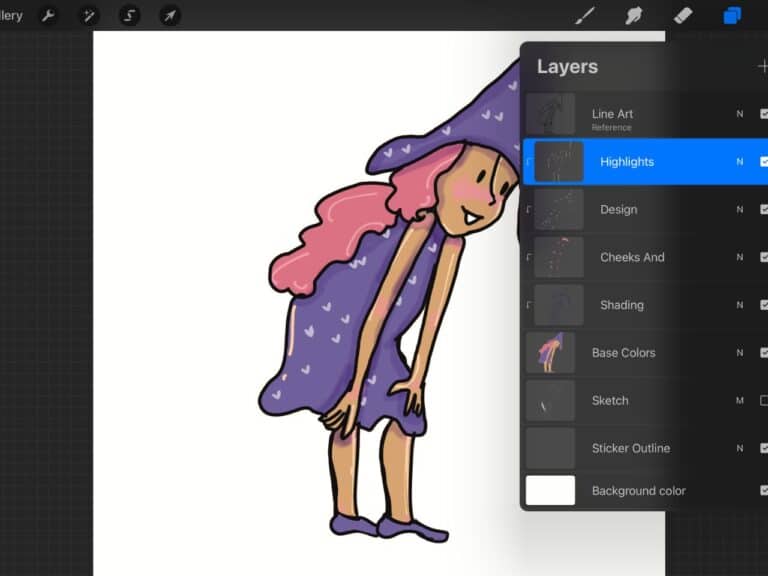
Layers: The Secret to Non-Chaotic Drawing
Layers are basically clear sheets stacked on top of each other. You can sketch on one, outline on another, color on a third and they won’t mess with each other.
Game. Changer.
Some layer tips for sticker sanity:
- Always sketch and ink on separate layers. You’ll thank yourself later.
- Name your layers something helpful (unless you enjoy scrolling through 12 files called “Layer 1”).
- Don’t merge layers too soon unless you’re 1000% sure. There’s no going back. (We’ve all learned that the hard way.)
Selection Tool: For When Your Drawing Looks Kinda… Off
Ever finish a drawing and think, “Ugh, I wish I could just nudge this eye a little to the left”? You can.
Use the Selection Tool to:
- Move things around
- Resize parts of your drawing
- Fix proportions without redrawing the whole dang thing
- Highly recommend for perfectionist moments that sneak up mid-chaos.
Color Palettes: The Unsung Heroes
Procreate lets you create your own color palettes which is huge when you want your sticker collection to look cohesive without reinventing the color wheel every time.
You can:
- Pull colors from a photo (like that sunset you screenshotted for vibes)
- Save them as a named palette
- Keep them handy for future stickers in the same series
- No more “what shade of green did I use on that frog again??” moments.

Setting Up Your Canvas in Procreate (Yes, Before You Get Too Excited and Start Drawing)
Okay listen… I know. You just wanna start doodling and drop shadows on a smiling ghost holding a coffee cup.
But before the fun begins, we gotta talk canvas setup because starting off right saves SO much stress later (ask me how I know 😅).
Here’s how to set up your canvas in Procreate so your stickers look crisp, print beautifully, and don’t betray you mid-project:
1. Resolution: Go Big (300 DPI or Bust) Set your resolution to 300 DPI (dots per inch). It sounds technical, but it’s just the magic number that makes your stickers look sharp especially if you plan to print them.
Low DPI = blurry regrets.
High DPI = crispy clean sticker vibes.
2. Canvas Size: Start Square, Adjust Later If you’re not sure what size to start with, go with something like 2048 x 2048 pixels. It’s a solid middle ground, not too big, not too small, juuuust right.
3. Color Mode: RGB is Totally Fine If you’re printing stickers at home, maybe (or just making them for digital use). You can do a quick sketch in a few colors and print it out on regular paper to see how accurately your colors print.
You might not need to worry about CMYK unless you’re working with a professional printer that specifically asks for it most sticker companies will so it depends where you are printing.
Now you’re ready to actually start drawing without wondering halfway through if you messed something up in the settings. Let’s gooo!

Sticker-Making Tips in Procreate: How to Design Your First Sticker in Procreate
Okay. You’ve got your tools. Your canvas is set. You’re vaguely emotionally prepared. Now it’s time to actually make your first sticker.
Deep breath. We’re doing this together.
This part doesn’t have to be perfect. In fact, it shouldn’t be it’s your first one!
The goal here is to get comfy with the process and start making art that feels like yours.
Let’s break it down step by step:
Step 1: Start With a Sketch
Every cute sticker starts as a messy lil idea. So open up your new canvas and grab a sketching brush (the 6B pencil is a solid beginner fave).
- Don’t stress about details this is your “what if…” phase.
Keep your lines light and loose - Think bold, simple shapes over tiny fussy stuff
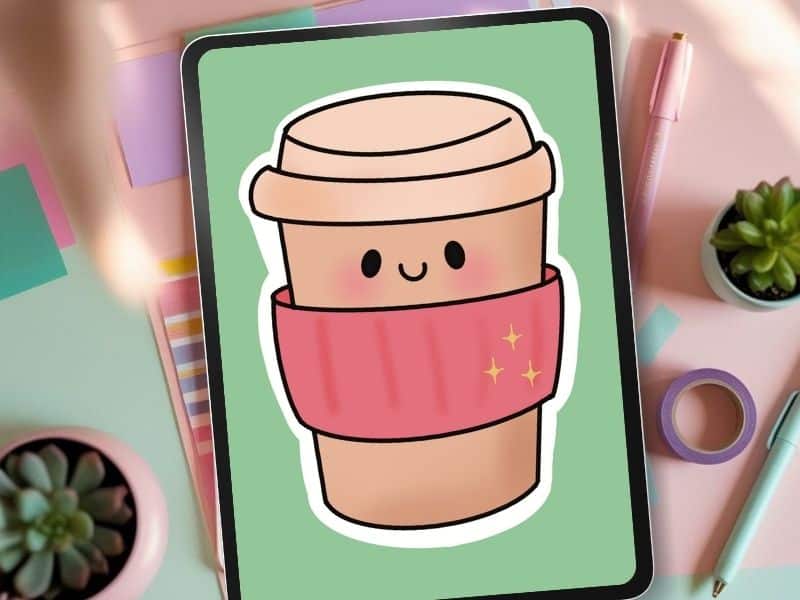
- Not sure where to start? Try something small: a plant, a snack, a coffee cup with a lil face on it 👀
Wanna get fancy? Use the Symmetry Tool to help with balance (especially for faces, hearts, or anything center-aligned).
And remember: wonky lines > no lines. Just getting something down is the win.
Step 2: Inking Time
Once your sketch feels decent-ish, add a new layer above it. Lower the sketch opacity so it’s faint (around 20–30%), then trace it on the new layer using a clean brush like Studio Pen or Technical Pen.
- Tips for stress-free inking:
Use StreamLine to smooth out your wobbly lines (we love assistive technology) - Zoom in to get clean corners, but zoom out often to check the whole vibe
- Don’t be afraid to undo. Or redo. Or re-redo.
Your outlines don’t need to be perfect they just need to feel good enough to move on. Progress over pixel perfection.
Step 3: Add Some Color
Now the fun part: making it pop!
- Add a new layer below your line art
- Choose a color palette (Procreate lets you make and save your own too)
- Use the ColorDrop tool (drag and drop from the color circle) to quickly fill in spaces
- Want depth? Add shadows with the Multiply blend mode or highlights with Add
You can also try the Soft Airbrush tool for blending, or the Selection Tool to color just one area at a time.
Tip: Test your sticker on both a white background and a transparent one. It helps you spot weird edges or gaps before exporting later.

Final Touches: Shadows, Highlights, and Texture Magic (That Make Your Stickers Pop)
The final touches are where the magic happens. Adding shadows, highlights, and textures will elevate a flat sticker into something visually dynamic.
Here’s how to do it:
Add Shadows (aka Tiny Drama)
Shadows make your design look more 3D like it’s ready to peel off the page.
Here’s the how-to:
- Make a new layer UNDER your colors
- Set it to Multiply blending mode
- Use a soft airbrush in a medium gray or a darker tone of your base color
- Lightly brush where the “light” wouldn’t hit (bottom edges, behind objects, etc.)
Pro tip: If you’re overwhelmed, pretend the light is coming from the top-left. Classic default. Less thinking.
Add Highlights (Because Your Art Deserves to Glow)
- Now bring in the sparkle.
Add a new layer ABOVE your colors - Set it to Add blending mode (aka glow mode)
- Grab a small soft white brush and tap on raised edges or shiny spots (like glass, cheeks, or sparkle accents)
Want to get fancy? Try a colored highlight instead of plain white pastel yellow or baby blue can be so cute.
Add Texture (Without Making It Messy)
Texture gives your sticker that “handmade with love” feel.
You can:
- Use Procreate’s texture brushes (like grunge, halftone, or stipple)
- Try a paper grain overlay
- Or just scribble gently with a chalk brush for subtle vibes
The goal isn’t to overwhelm it’s to give your design a little character. Like, “Yes I’m cute, but I also have depth.”
For more step-by-step sticker tutorials and demonstrations, be sure to check out my YouTube channel where I walk you through each process in real time. It's a great way to pick up extra tips and tricks!

Exporting & Printing Your Procreate Stickers (Without Losing Your Mind or Your Margins)
You’ve designed your sticker. You’ve added shadows, highlights, and texture.
Now it’s time to bring that art to life like, actually print it out and hold it in your hand. Let’s talk exporting and printing without turning it into a full-on tech spiral.
Exporting from Procreate: What You Need to Know
Here’s the least chaotic way to get your design out of Procreate and ready for printing:
- File Type: PNG is your bestie. It supports transparent backgrounds — which is crucial for stickers with funky shapes or cutout edges.
- Resolution: 300 DPI — You’ve been working in it, now make sure you’re exporting in it too. This keeps everything crisp.

Home Printing Tips (For the Crafty, Budget-Conscious Queens)
You can absolutely print your own stickers at home and they can look amazing with the right setup.
Here’s what works:
- Printer: A solid inkjet printer that supports high-quality photo or label printing (Canon and Epson are sticker faves).
- Paper: Use vinyl sticker paper for durable, waterproof stickers. Glossy = shiny, matte = soft aesthetic. Up to you.
- Cutting: Silhouette = crisp precision. Scissors = great if your sticker’s not shaped like a baroque picture frame.
Test print first! Use plain paper to check size, color, and layout. Don’t waste your good sticker paper on version 1.
Print settings matter! Switch to “Best” or “Photo Quality” and select the right paper type in your printer dialog box.

Professional Printing
If you’re planning to sell your stickers, gift them, or just want them to feel super pro outsourcing your prints is totally worth it.
Things to know:
- Most services prefer high-res PNGs or PDFs with transparent backgrounds
- Look for services like Sticker App, Printify, or a local print shop that offers vinyl or weatherproof options
- You can choose between glossy, matte, or even holographic finishes for that extra wow factor
- Always order a small test batch first avoid heartbreak (and wasted money)

Common Mistakes in Procreate (and How to Avoid Spiral-Level Regret)
Look. We’ve all been there that moment when you zoom in on your sticker and realize your shadow layer is on the same layer as your line art, and you have no idea how it happened but now you’re in too deep.
Sticker-making in Procreate is super fun, but there are some beginner pitfalls that can trip you up if no one warns you.
So here I am, gently waving my chaos flag like, “Learn from my mistakes, friend.”
Mistake #1: Merging Layers Too Soon
You can’t unmerge. Once it’s glued together, it’s stuck like permanent glitter or the “one time” you tried bangs.
Do this instead:
- Label your layers (yes, it’s boring but it’ll save your sanity)
- Use layer groups to stay organized
- Merge only when you’re absolutely sure you’re done tweaking

Mistake #2: Overcomplicating Your Design
If your sticker has twelve colors, three fonts, sparkles, shading, and a hand-drawn banner… it might be doing too much.
Here’s why simple wins:
- Stickers are small. Bold shapes and clear lines read better
- Simple = faster edits and cleaner cuts (especially if you’re printing)
- One strong idea always beats five half-formed ones
Start with one concept: one shape, one word, one vibe. You can always layer on more later.
Mistake #3: Using Too Many Colors
More colors = more chaos (and not the fun kind). If everything’s bright, nothing stands out. Keep it cute + cohesive by:
- Limiting your palette to 3–5 colors
- Reusing your color palette across multiple designs for a sticker set
- Using Procreate’s palette tools to pull colors from photos you love (hello, sunset inspiration!)
By avoiding these beginner mishaps, you give yourself room to grow creatively while building a foundation for great sticker-making.
💖 Key Takeaways: Sticker‑Making Tips in Procreate
- 💖 You don’t need fancy gear — your iPad + Apple Pencil + Procreate are enough to start.
- 💖 Set your canvas to 300 DPI for crisp, high‑quality stickers that print well.
- 💖 Use layers for sketches, inks, and colors — it keeps your workflow clean and stress‑free.
- 💖 Shadows, highlights, and texture help your stickers feel dynamic and professional.
- 💖 Export in PNG for transparent backgrounds and clean outlines — ideal for cutting.
- 💖 Test prints at home or with a pro service before selling them or gifting them.
💖 FAQs: Sticker‑Making in Procreate
- 💖 Do I need a new iPad to make stickers? Not at all! Any iPad that works with Apple Pencil and runs Procreate works great — you just might manage storage differently.
- 💖 What DPI should I use for printing stickers? 300 DPI is the sweet spot for crisp, print‑ready stickers with clean edges.
- 💖 Should I use PNG or JPG for exporting? PNG is best because it supports transparent backgrounds — perfect for cut‑out stickers.
- 💖 Do my stickers have to be perfect? Nope — handmade charm is part of the appeal! Focus on clean lines and bold shapes for the best results.
- 💖 Can I print stickers at home? Yes — with the right paper and printer settings you can make gorgeous home prints before trying professional services.
- 💖 What if I want to sell my stickers? Start with home printing and test batches, then consider pro services like StickerApp or local print shops for higher‑quality vinyl options.

Sticker-making in Procreate is fun, approachable, and full of “OMG I didn’t know I could do that” moments.
You don’t have to be perfect. You just have to start.
Experiment. Play. Make a frog with five legs and then love him anyway. Every sticker teaches you something new — and that’s the magic.
So whether you're making art during your kid’s nap, sneaking in a few brush strokes between meetings, or staying up way too late with your Apple Pencil… just know:
You're doing great. Your creativity matters. And your next sticker might be your favorite one yet.
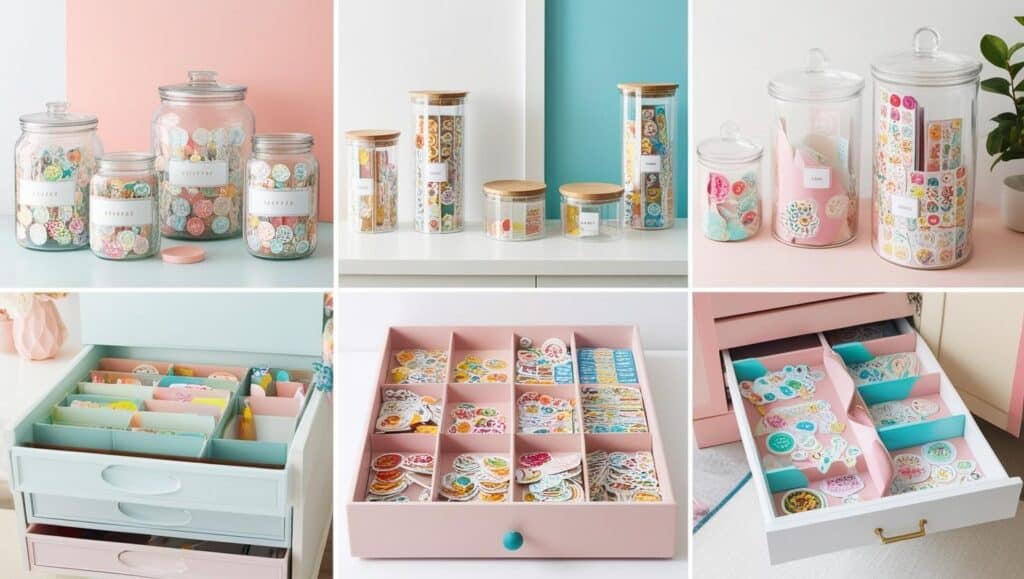
If you're looking for more ideas to pair with your new designs, check out DIY Sticker Storage Ideas to keep your creations organized and ready to use.
Don’t forget to visit my YouTube channel for more sticker-making tips in procreate and up-close tutorials to help you every step of the way. Happy designing!
Need creative uses for all your fabulous new stickers check out Stickers for a Creative Outlet: Fun Ways to Express Yourself
have you joined the art to income: create & Sell digital products facebook group?
If you’ve ever said, “I want to draw digitally, but I have no idea where to start,” this is your sign.
We learn Procreate tricks, share designs, celebrate tiny wins, and cheer each other on as we start selling what we make.
💕Join Us on Facebook✨
Want More Procreate
Whether you’re just starting out or ready to try your next cute design, here’s a full list of tutorials, tips, and easy wins for making stickers in Procreate:
Start Here: Beginner-Friendly Guides
- Procreate Beginner Guide for Stickers
- Making Stickers in Procreate for Beginners
- How to Design Stickers in Procreate
- How Procreate Stickers Boosted My Confidence as a Creative Mom
- How Procreate Helped Me Reconnect with Creativity
- What I Learned from Trying A Daily Sticker Sketch Challenge(and Failing Sometimes Too)
Learn Cute Sticker Drawing Techniques
- Draw a Cute Blushing Star Sticker
- Designing a Cute Bunny Sticker
- How to Draw Cute Cherries
- Draw a Cloud in Procreate (Easy!)
- Design a Daffodil Sticker in Procreate
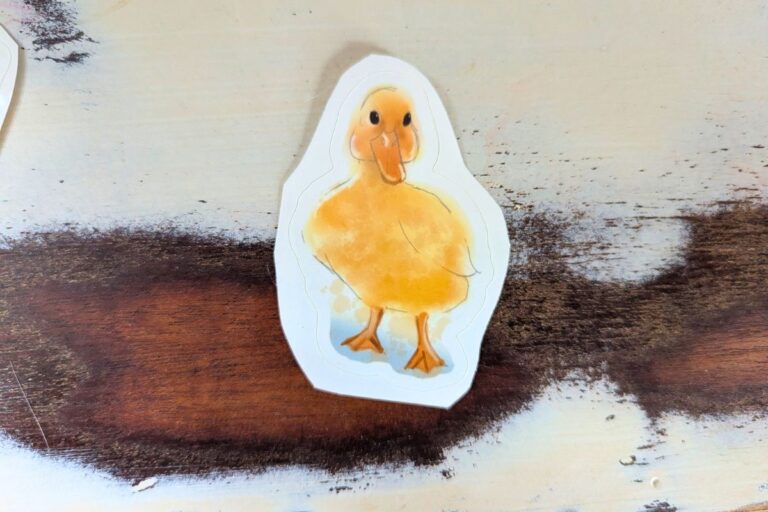
- Draw a Baby Duck in Procreate
- How to Make Your First Digital Sticker in Procreate (In 10 Minutes!)
- 3 Easy Outline Effects in Procreate That Make Your Stickers Pop
Procreate Tools, Ideas & Tips
- Easy Procreate Sticker Ideas
- Sticker Making Tips in Procreate
- Procreate vs Canva for Sticker Design
- How to Design Stickers
- Procreate Tools for Sticker Design: The Beginner’s Guide for Burnt-Out Moms
- Using Layers for Stickers in Procreate
- Clipping Masks For Procreate Stickers (with Less Stress and More Fun!)
- Best Canvas Size for Procreate Stickers (Beginner Guide)
- Best Procreate Brushes for Stickers (Free & Paid)
- Resizing Stickers in Procreate: The Busy Mom’s Guide to Sanity, Success, and Not Losing It
- Procreate Color Palettes for Stickers, Effortless Sticker Color Magic
- Eraser Tool Tips for Procreate Stickers (That Even Exhausted Moms Can Master)
I have also created an entire Procreate Starter Kit with a complete sticker file so you can see exactly how I made it!
Be sure and Pin your favorite image below to your sticker making board in Pinterest!