DPI, bleed, and trim for printable wall art, a simple setup that prevents blurry prints
You finish a gorgeous illustration, export it, and it looks perfect on your screen. Then you print it and… why does it feel a little fuzzy, like your art is wearing smudgy glasses?
That heartbreak usually comes from three quiet troublemakers: printable wall art dpi, plus bleed and trim. The good news is you don’t need to be a “print person” to fix it. You just need one simple setup you can repeat every time, like a reliable recipe.
If you sell digital downloads, this is also a customer happiness issue. Clear files mean fewer “my print looks blurry” messages, and more five star reviews.
DPI for printable wall art, what it really controls (and what it doesn’t)
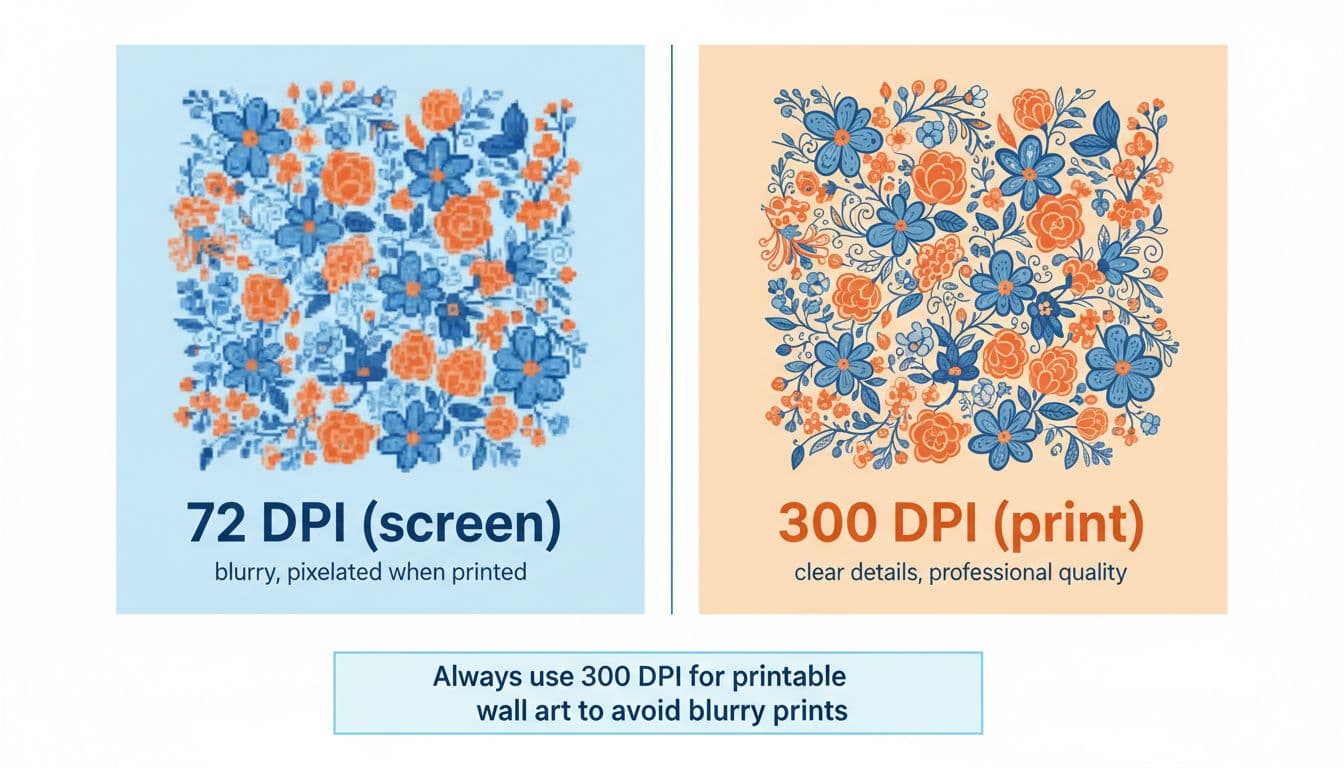
People say “DPI” as a catch all, but for your exported file, you’re mostly dealing with PPI, pixels per inch. Printers use dots, your file uses pixels, and the concept is basically the same: more detail packed into each inch equals a sharper print.
Here’s the part that saves you from blurry prints:
Your art only prints as sharp as the pixel dimensions allow.
Changing a number in an export box doesn’t magically add detail. If your artwork is 1200 by 1500 pixels and you try to print it at 8 by 10 inches, it’s going to look soft because you’re stretching it.
A solid default for art prints is 300 PPI at the final print size. It’s not the only acceptable number, but it’s a safe “no drama” choice for posters and wall art. Print providers often say the same thing, and you can see a practical overview in Printful’s guide on creating a wall art print file.
The quick math you’ll actually use
To find the pixels you need:
inches × 300 = pixels
So an 8 by 10 inch file at 300 PPI is:
- 8 × 300 = 2400 pixels
- 10 × 300 = 3000 pixels
That simple.
Bleed, trim, and safe area, the three lines that stop “oops” cuts
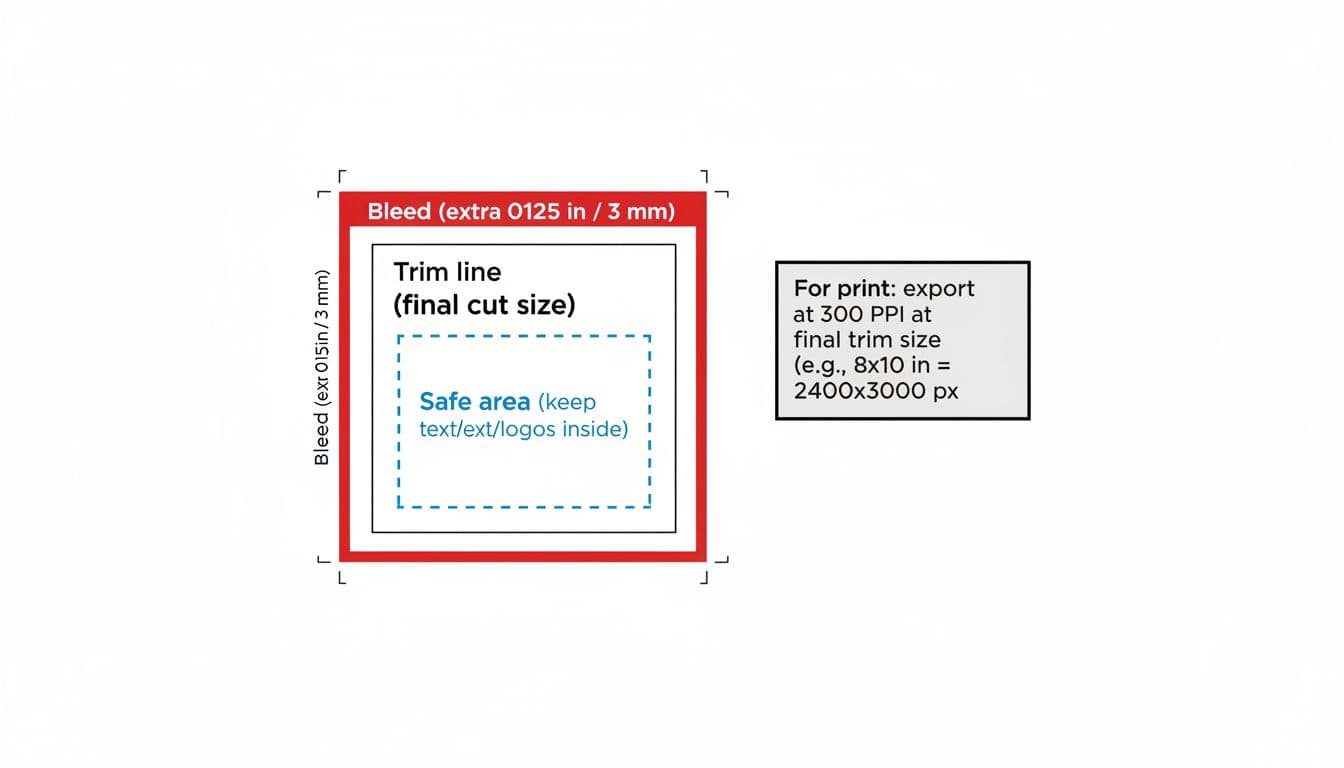
Think of printing like cutting brownies. Even if you cut carefully, the knife never lands in the exact same spot every time. Paper trimming works the same way.
These three areas keep your printable wall art looking intentional after it’s cut:
Trim size: The final finished size the customer wants (like 8 by 10). This is the “brownie” you serve.
Bleed: Extra artwork that extends past the trim line, so the print can be cut cleanly with no white sliver on the edge. A common standard is 0.125 inch (3 mm) on each side, but always check the printer’s rules.
Safe area: The “don’t risk it” zone inside the trim line. Keep important stuff (faces, text, logos, small details) away from the edge so it doesn’t get clipped. Many designers use about 0.25 inch as a comfortable buffer, and a little more if the piece has text. For more information on picking the right canvas size, check out Best Canvas Size for Procreate Stickers (Beginner Guide)
free kit
The Art Style Kit helps you stop guessing and start building your art style with simple exercises, a clear workbook, a gallery page to track your progress, and a set of fun hand-drawn artist stickers.
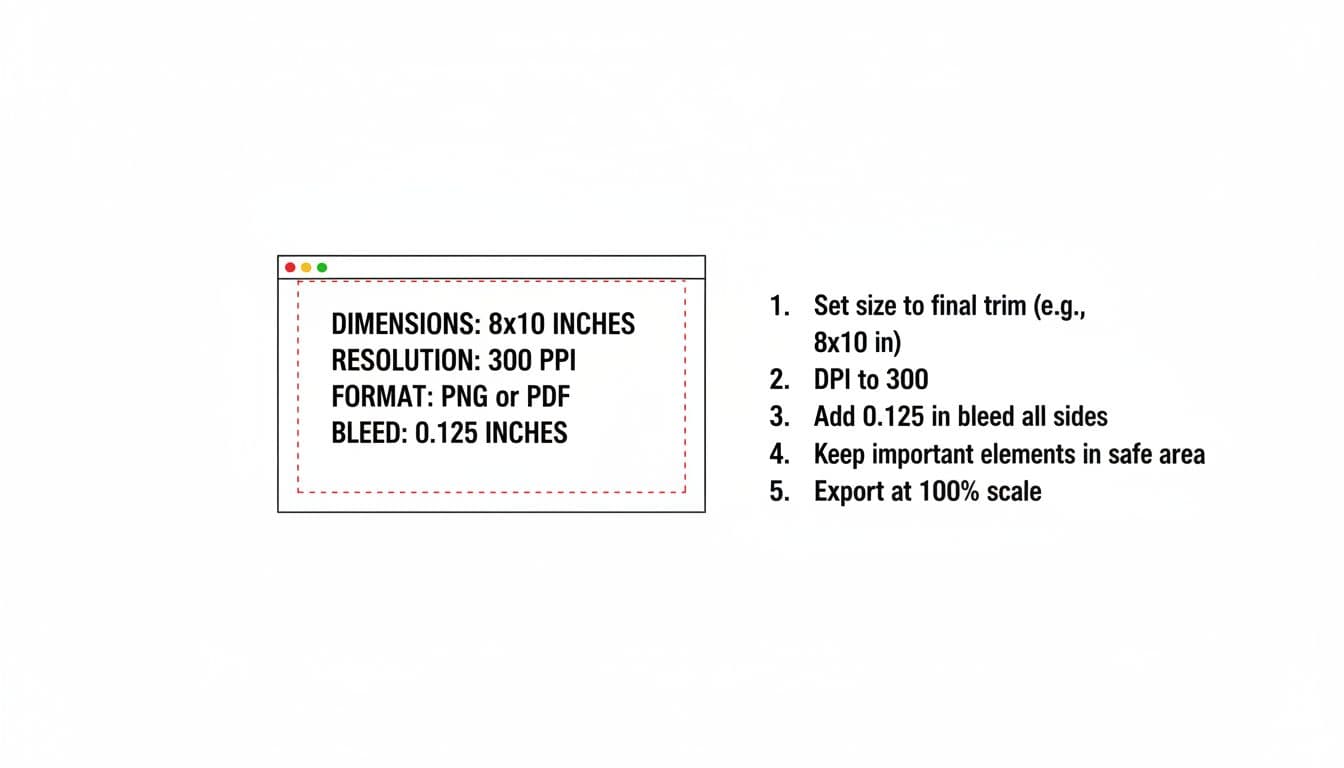
The simple setup you can repeat every time (no matter your app)
You don’t need a complicated workflow. You need a repeatable one. Here’s the basic pattern:
- Choose the final trim size you’re selling (8 by 10, 11 by 14, 16 by 20, etc.)
- Build the file at 300 PPI at that size
- Add bleed if your buyer or printer needs edge to edge printing
- Keep key details inside a safe area
- Export in a format that doesn’t crush your details
If you want a deeper “how do people actually print these at home” perspective, this guide on how to print printables is a helpful companion read.
Common print sizes and pixel dimensions at 300 PPI
| Trim size (inches) | Pixels at 300 PPI |
|---|---|
| 5 × 7 | 1500 × 2100 |
| 8 × 10 | 2400 × 3000 |
| 11 × 14 | 3300 × 4200 |
| 16 × 20 | 4800 × 6000 |
If you plan to offer multiple ratios (like 2:3, 3:4, 4:5), design with that in mind early. Cropping later is where great compositions go to get weird.
Export settings that keep your art crisp (and customers calm)
A sharp file can still print poorly if you export it in a way that throws away detail. Before you ship your download, do a quick “print brain” check:
Scale: Export at 100 percent of the size you designed. Don’t rely on “fit to page” later if you can avoid it.
Compression: Heavy compression causes mushy edges and banding in gradients. If your art has texture, pencil lines, or watercolor grain, you’ll notice.
File type:
- PNG is great for clean edges and graphics, and it avoids some compression issues.
- JPG can be fine if exported at high quality, but it can soften details.
- PDF is often preferred for print shops, especially when bleed and crop marks matter.
Color: Many digital artists work in RGB and still get beautiful prints, especially for home printing. Some print shops prefer CMYK files or have specific profiles. If you’re uploading to a professional printer, check their instructions first.
have you joined the art to income: create & Sell digital products facebook group?
If you’ve ever said, “I want to draw digitally, but I have no idea where to start,” this is your sign.
We learn Procreate tricks, share designs, celebrate tiny wins, and cheer each other on as we start selling what we make.
💕Join Us on Facebook✨
Bleed without stress, two easy ways to handle it
Bleed scares people because it sounds technical, but it’s just “extend your background.”
Two simple approaches:
If your background is solid color or simple texture: Make your canvas slightly larger than the trim size (to include bleed), then keep your important art inside the trim and safe zone.
If your art already fills the page: Duplicate your background or edge elements and extend them outward. The goal is to avoid empty borders outside the trim line.
If you’re working in a drawing app, you can also export two versions when it makes sense:
- A “trim size only” file for home printers that want a clean border.
- A “with bleed” file for professional printing.
Your listing can explain which file is for what. Less confusion, fewer refunds. Check out Learning to turn digital art to income if you are trying to get started.
The most common reasons prints look blurry (and the fast fix)
Blurry prints rarely come from one mysterious cause. It’s usually one of these:
You started too small: If you designed at web size and tried to scale up later, the file won’t have enough pixels. Fix it by designing at final size from the start. For step-by-step instructions and practice, try creating your First Sticker in Procreate.
Your customer is enlarging it: If you sell an 8 by 10 and someone prints it at 16 by 20, it will soften. Fix it by offering larger sizes, or by clearly stating the max size in your listing and file guide.
The export was low quality: Some apps default to lower quality JPG exports. Fix it by choosing the highest quality setting, or exporting PNG or PDF when appropriate.
The print dialog is shrinking or stretching: “Fit to page” can change size in sneaky ways. Fix it by telling customers to print at “actual size” when they’re using your exact trim file.
For a practical overview of wall art sizes and file formats sellers use, this YouTube video is a useful reference: Printable Wall Art on Etsy sizes and file formats explained.
When your printable wall art dpi is set up right, and you treat bleed and trim like normal parts of the process, your files print cleanly and predictably. You stop guessing, and you stop re-exporting the same design five different ways. Keep your trim size clear, build at 300 PPI, add bleed when needed, and protect your details with a safe area. Your future self (and your customers) will thank you for the sharp, print-friendly setup.

🎨 Art to Income Membership
Turn your doodles into dollars — one simple, sellable project at a time.
If you're staring at Procreate wondering how people go from drawing frogs in sweaters to actually selling stuff — you're not alone.
This membership helps you go from “where do I even start?” to having a finished product ready to list.
Each month you’ll get:
💖 One guided project to create and list a finished product
💖 Done-for-you assets to speed things up
💖 Trend + keyword ideas so you know what people are actually buying
💖 A supportive group of artists figuring it out right alongside you
💖 Listing and promo ideas so your art doesn’t just sit in a folder
You don’t need to be techy, trained, or totally “together” — just curious enough to try.
🎥 Prefer to learn by watching?
I’ve got a YouTube channel full of quick, no-pressure tutorials made for tired, creative souls like you.
Subscribe here and catch your next creativity boost, one sticker at a time.
Love and messy buns,
❤️
Cynthia McDonald
Helping women find creativity in the chaos — with stickers, stationery, and a little bit of fun
This post may contain affiliate links. I may earn a commission if you make a purchase at no extra cost to you.
Make sure and grab your favorite Pinterest Pin and Save it to your Digital Art Pinterest Board